OpenCV is an image processing library developed by Intel.
This article shows you how to install OpenCV on Raspberry Pi.
Contents
- Overview of OpenCV
- Overview of OpenCV_contrib, an extension module of OpenCV
- How to install OpenCV on Raspberry Pi
sponsored link
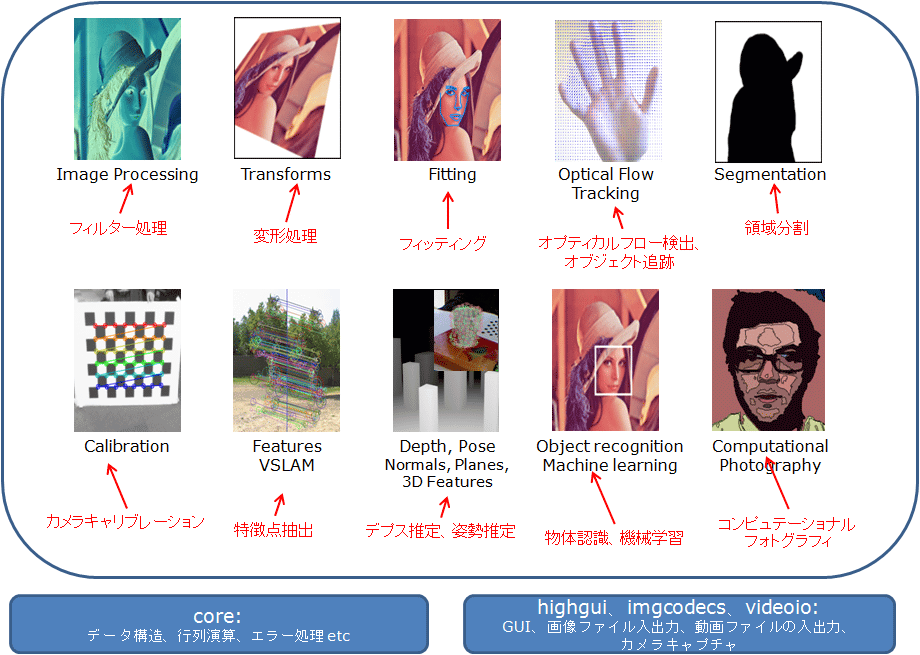
Overview of OpenCV
I will show you an overview of OpenCV.
With OpenCV, you can mainly use the following functions.
- Image Processing
- Transforms
- Fitting
- Optical Flow Tracking
- Segmentation
- Calibration
- Features VSLAM
- Depth, Pose Normals, Planes, 3D Features
- Object recognition Machine learning
- Computational Photography
I quote from the explanation on this site.
An extension module called OpenCV_contrib allows the use of new algorithms and experimental functions.
In the next section, I will briefly show an overview of OpenCV_contrib.
Overview of OpenCV_contrib
I will briefly show you an overview of OpenCV_contrib.
The official OpenCV tutorial is helpful in learning about functions of OpenCV_contrib.
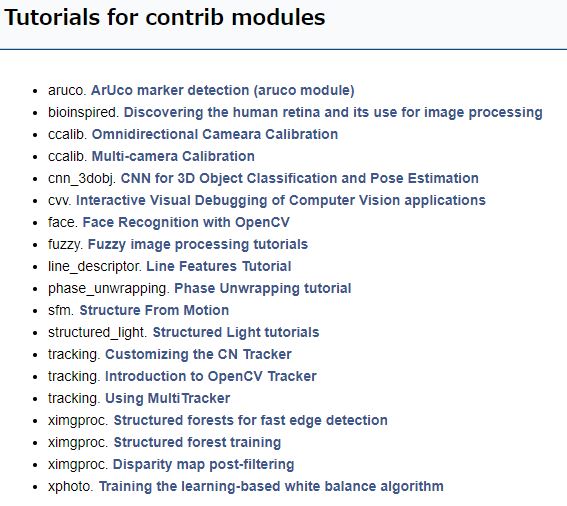
For example, a module called "aruco" can detect 2D marks and extract their coordinates.
quotation : The official OpenCV tutorial

I installed OpenCV_contrib because I wanted to detect AR marker by using "aruco".
sponsored link
How to install OpenCV on Raspberry Pi
I will show you how to install OpenCV on Raspberry Pi.
There are two ways to install OpenCV as shown below, but I will show method No.2 because it is easier.
- Build from OpenCV source code
- Install pre-built package with "pip" command
Follow the steps below to install OpenCV.
Procedure
- Update the RaspberryPi package
- Install libraries that depend on OpenCV
- Install OpenCV with "pip" command
Update the RaspberryPi package
First, update the "list" of installable packages and update the installed packages.
Enter the following command in the terminal.
$ sudo apt-get update$ sudo apt-get upgradeUpdate "pip".
$ sudo pip install --upgrade pipInstall libraries that depend on OpenCV
Next, install libraries that depend on OpenCV.
Enter the following command in the terminal.
$ sudo apt-get install libhdf5-dev libhdf5-serial-dev libhdf5-100
$ sudo apt-get install libqtgui4 libqtwebkit4 libqt4-test python3-pyqt5
$ sudo apt-get install libatlas-base-dev
$ sudo apt-get install libjasper-dev
If the installation of "libhdf5-100" does not work, try "libhdf5-103" as well.
Install OpenCV with "pip" command
Install OpenCV with "pip" command.
Note that there are several different types of pip commands.
In a coexisting environment of Python 2 and Python 3, "pip" command is an installation for Python 2 and "pip3" command is an installation for Python 3.
Since Python2 and Python3 are installed on Raspberry Pi, mistaking "pip" and "pip3" may result in unexpected behavior.
It is recommended to check the python version before installation.
How to check the python version of Raspberry Pi and change to python3
If you only need to install the main OpenCV module, use the following command to install it.
$ sudo pip3 --default-timeout=1000 install opencv-pythonIf you want to install extension modules, install "opencv-contrib" after installing "opencv-python".
In this case, make sure that the versions of "opencv-python" and "opencv-contrib-python" are the same.
How to specify the version is explained in the next section.
sponsored link
If an error occurs during OpenCV installation
If the installation does not work, the OS version may be too old to support the latest version of OpenCV.
Enter the following command to check the version of OpenCV that can be installed.
$ sudo pip3 install opencv-python==$ sudo pip3 install opencv-contrib-python==Install with the version specified command.
Here is an example of installing version 3.4.14.51.
$ sudo pip3 --default-timeout=1000 install opencv-contrib-python==3.4.14.51The latest version of "opencv-contrib-python" was 4.5.2.52, but the author was able to install it with version 3.4.14.51.
If this does not work, try uninstalling and then reinstalling OpenCV using the following command.
$ sudo pip3 uninstall opencv-contrib-pythonsponsored link
Check that OpenCV is properly installed
To check that OpenCV is installed properly, run Python and import OpenCV.
Enter the following command to run Python.
$ python3Import OpenCV.
>>> import cv2Check the version of OpenCV.
>>> cv2.__version__If the version is displayed, the installation was successful.
In the author's environment, the following error occurred
" ImportError: numpy.core.multiarray failed to import "
This is an error that occurs when the version of numpy is old, so update numpy with the following command.
$ sudo pip3 install -U numpysponsored link