This article shows how to control a servo motor with Raspberry Pi and servo driver "PCA9685".
If a servo motor is powered directly from Raspberry Pi, the operation may become unstable, so a driver for a servo motor is used.
Contents
- Parts required to control a servo motor
- Connection of each parts
- How to control with I2C communication from Raspberry Pi
- How to install the library for driver control
- Python sample code for driver control
sponsored link
Parts required to control a servo motor
These are the parts prepared to control a servo motor from Raspberry Pi.
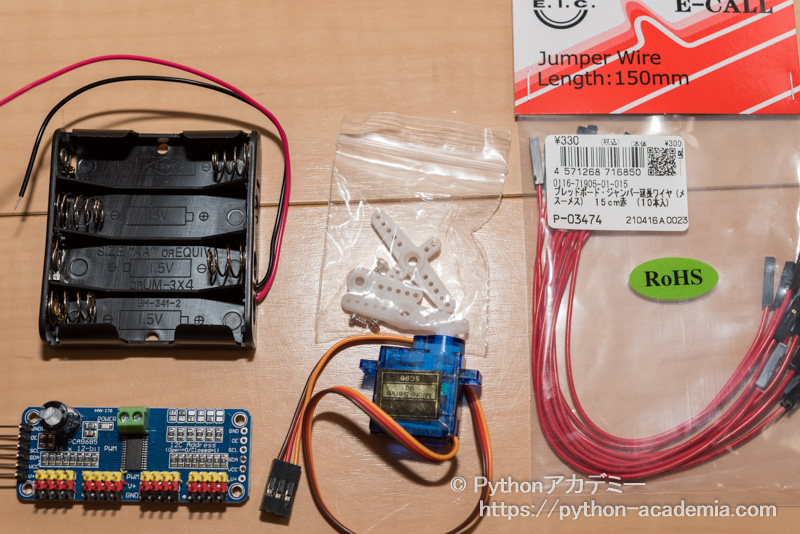
I show the parts, with links to Amazon.
Servo motor driver
This driver can control up to 16 servo motors.
PWM control is supported.

( Sorry, link to Amazon japan )
Alternatives on Amazon US.
Servo motor
The standard servo motor "SG90" was used.
Control angle is ±90°.

( Sorry, link to Amazon japan )
Alternatives on Amazon US.
Jumper wire
A female-female jumper wire is required to connect Raspberry Pi to the servo motor driver.
This product is a set of male-male, male-female, and female-female.

( Sorry, link to Amazon japan )
Alternatives on Amazon US.
Battery holder
The battery box is used to supply voltage to the servo motor driver.
Since the operating voltage of the servo motor is 4.8 V, a case for four AA batteries is used.

( Sorry, link to Amazon japan )
sponsored link
Connection of each parts
From here, I show how to connect each part.
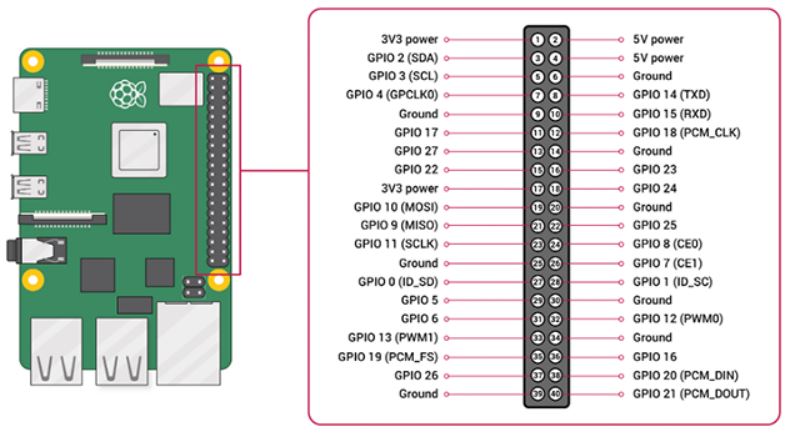
GPIO and the 40-pin Header on Raspberry Pi 4
Here is the pinout of the Raspberry Pi.
quotation : Raspberry Pi Documentation
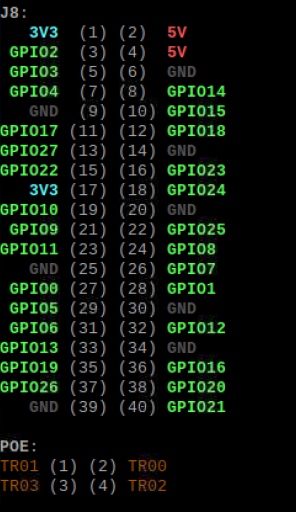
The pinouts of the Raspberry Pi can also be viewed by using the terminal.
Enter the following command in the terminal and the pinouts of the Raspberry Pi will be displayed.
$ pinout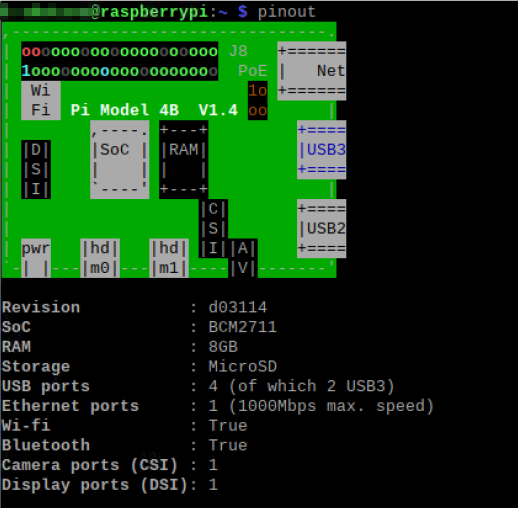
A servo motor is controlled with I2C communication.
The following pins are used.
3-pin: GPIO2 (SDA)
5-pin: GPIO3 (SCL)
circuit diagram
I show the connection of each part.
Here is the schematic.
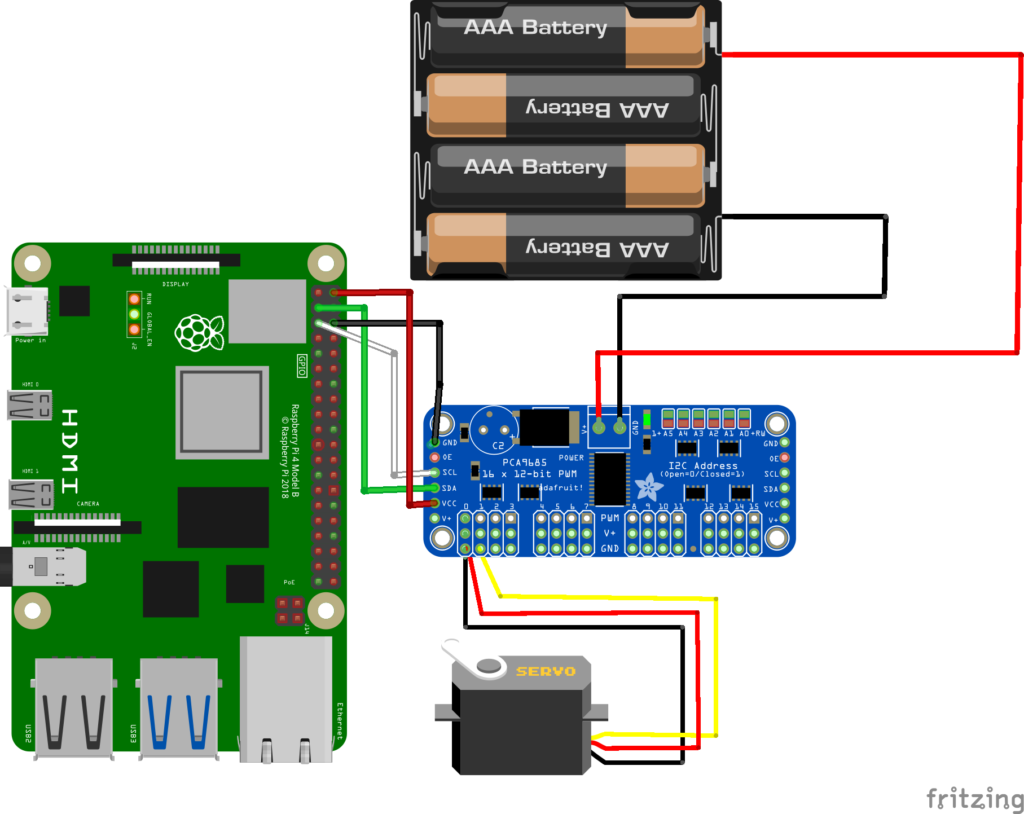
Raspberry Pi and servo motor driver (PCA9685) are connected as follows.
Raspberry Pi : 2-pin (5V) - Driver : VCC
Raspberry Pi : 3 Pin (SDA) - Driver : SDA
Raspberry Pi : 5-pin (SCL) - Driver : SCL
Raspberry Pi : 6 Pin (GND) - Driver: GND
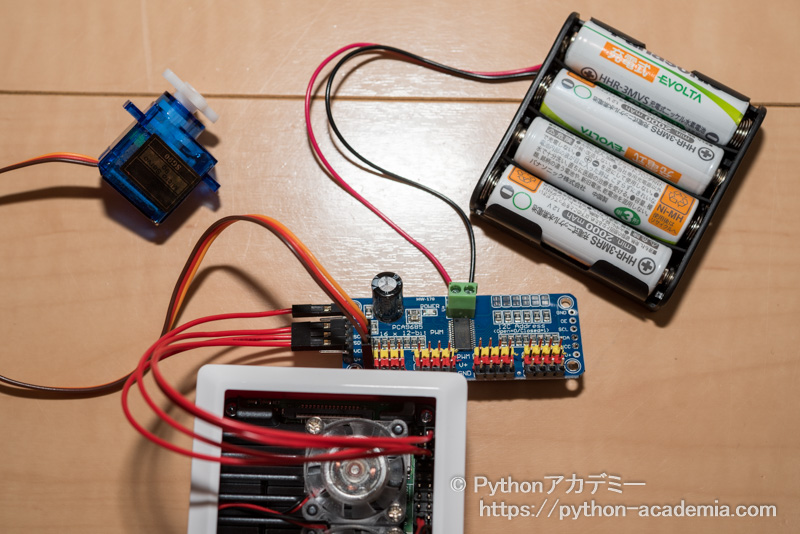
When each part is connected, it looks like the picture below.
The next step is to set up the I2C communication to control the servo motor.
sponsored link
How to control with I2C communication from Raspberry Pi
Set up the I2C communication to control the servo motor.
I2C (Inter Integrate Circuit) is the method for serial communication with peripheral devices.
Multiple slaves can be controlled by one master.
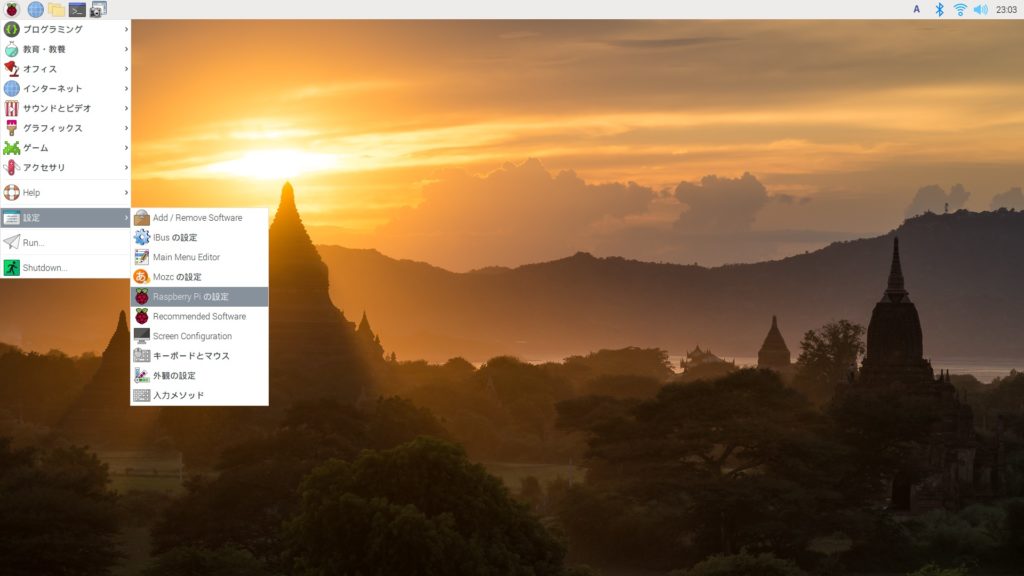
Enabling I2C communication on the Raspberry Pi
Enable I2C communication on the Raspberry Pi.
Go to "Preferences" > "Raspberry Pi Configuration".
( Sorry, Japanese is included. )
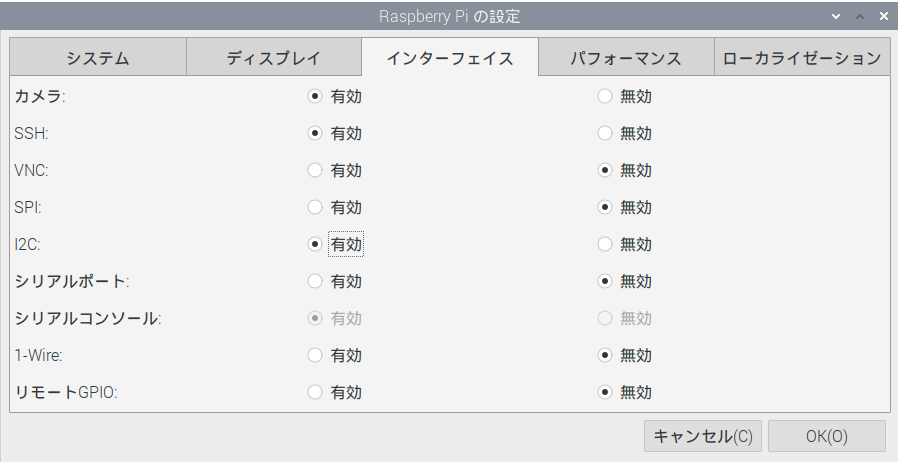
On the Interface tab, enable "I2C".
( Sorry, Japanese is included. )
Check if I2C communication is established between Raspberry Pi and PCA9685.
Check if I2C communication is established between Raspberry Pi and PCA9685.
Enter the following command in the terminal.
$ sudo i2cdetect -y 1If the following image is displayed, the I2C communication is established.
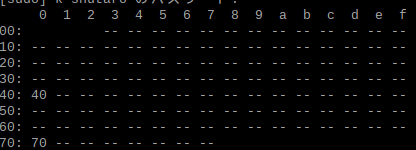
Channel 0x40 can be used for communication with PCA9685.
sponsored link
How to install the library for driver control
Prepare the necessary libraries to control the servo driver.
Download the required libraries from the Adafruit Git site.
Enter the following command in the terminal to download the library.
$ git clone https://github.com/adafruit/Adafruit_Python_PCA9685.git
$ git clone https://github.com/adafruit/Adafruit_Python_GPIO.git
$ git clone https://github.com/adafruit/Adafruit_Python_PureIO.git
The libraries are downloaded to "/home/"user" ".
Install the libraries into Python.
Enter the following command in the terminal to download the library. The libraries are also installed in Python3.
$ cd Adafruit_Python_PCA9685
$ sudo python setup.py install
$ sudo python3 setup.py install

$ cd ../Adafruit_Python_GPIO
$ sudo python setup.py install
$ sudo python3 setup.py install

$ cd ../Adafruit_Python_PureIO
$ sudo python setup.py install
$ sudo python3 setup.py install
sponsored link
Python sample code for driver control
I show Python sample code to control a servo motor.
Before understanding the code, it is necessary to understand the specifications of the servo motor.
Specifications of servo motor SG90
Specifications of servo motor SG90.
| Items | Specifications |
|---|---|
| Working Frequence | 50hz |
| Pulse Width | 0.5ms~2.4ms |
| Rotate angle | ±90°(180°) |
| Operating voltage | 4.8V(~5V) |
The key information is that the control pulse is 0.5 ms ~ 2.4 ms and the control angle is ±90°.
If you connect servo motors directly to Raspberry Pi, you need to write code according to these Pulse Width.
This time, a servo motor is connected to Raspberry Pi through a motor driver (PCA9685).
Using the libraries for the motor driver, pulses for the motor driver are sent.
python sample code
I show python sample code to control a servo motor with a motor driver (PCA9685).
Since the control angle of SG90 is 180°, I try to move a motor from 0 to 180° by 1°
import Adafruit_PCA9685
import time

class servo_Class:
    #"Channel" is the channel for the servo motor on PCA9685
    #"ZeroOffset" is a parameter for adjusting the reference position of the servo motor
    def __init__(self, Channel, ZeroOffset):
        self.Channel = Channel
        self.ZeroOffset = ZeroOffset

        #Initialize Adafruit_PCA9685
        self.pwm = Adafruit_PCA9685.PCA9685(address=0x40)
        self.pwm.set_pwm_freq(int(60))

    # Angle setting
    def SetPos(self,pos):
        #PCA9685 controls angles with pulses, 150~650 of pulses correspond to 0~180° of angle
        pulse = int((650-150)/180*pos+150+self.ZeroOffset)
        self.pwm.set_pwm(self.Channel, 0, pulse)

    # End processing
    def Cleanup(self):
        #The servo motor is set at 90°.
        self.SetPos(int(90))
        print('90')

if __name__ == '__main__':
    Servo0 = servo_Class(Channel=0, ZeroOffset=0)

    try:
        while True:

            for deg in range(180) :
                Servo0.SetPos(int(deg))
                print(deg)
                time.sleep(0.05)

    except KeyboardInterrupt:
        print("\nCtl+C")
    except Exception as e:
        print(str(e))
    finally:
        Servo0.Cleanup()

        print("\nexit program")
~ Brief explanation of the command~.
【Channel】
In this case, only one servo motor is controlled, so Channel is only 0.
By increasing the number of channels, multiple servo motors can be controlled.
Servo0 = servo_Class(Channel=0, ZeroOffset=0)
Servo1 = servo_Class(Channel=1, ZeroOffset=0)
Servo2 = servo_Class(Channel=2, ZeroOffset=0)
【Angle setting】
The angle is converted to a pulse value.
The Pulses ( 150~650 ) correspond to angle ( 0~180° ).
(650-150)/180 : Calculate the pulses per degree.
Also, since 0deg corresponds to a pulse value of 150, 150 is added.
Finally, I show a video of a servo motor being controlled from Raspberry Pi.
sponsored link